This is default featured slide 1 title

Go to Blogger edit html and find these sentences.Now replace these sentences with your own descriptions.This theme is Bloggerized by Lasantha Bandara - Premiumbloggertemplates.com.

This is default featured slide 2 title

Go to Blogger edit html and find these sentences.Now replace these sentences with your own descriptions.This theme is Bloggerized by Lasantha Bandara - Premiumbloggertemplates.com.

This is default featured slide 3 title

Go to Blogger edit html and find these sentences.Now replace these sentences with your own descriptions.This theme is Bloggerized by Lasantha Bandara - Premiumbloggertemplates.com.

This is default featured slide 4 title

Go to Blogger edit html and find these sentences.Now replace these sentences with your own descriptions.This theme is Bloggerized by Lasantha Bandara - Premiumbloggertemplates.com.

This is default featured slide 5 title

Go to Blogger edit html and find these sentences.Now replace these sentences with your own descriptions.This theme is Bloggerized by Lasantha Bandara - Premiumbloggertemplates.com.

Wednesday, July 28, 2021

HTML Table tag: table tag in HTML - HTML Tutorial

Table tag in HTML: 

HTML table tag is used to display data in tabular form (row * column) There can be many columns in a row. 

We can create a table to display data in tabular form  using <table>element with the help of <tr>, <td>, and <th> elements. 

In Each table table row is defined by <tr> tag, table header is defined by <th> tag and table data is defined by <td> tags.


Sunday, July 25, 2021

HTML Image tag: Image tag in HTML - HTML Tutorial

HTML Image tag:

HTML img tag is used to display image on the web page. HTML  img tag is an empty tag that contains attributes only closing tags are not used in HTML image element.

Example: 

<h1> HTML Image tag </h1>

<img src="Good Morning.jpg" alt="Good Morning Friends">

Output:

Attributes of HTML img tag:

The scr and alt are important attributes of HTML img tag. All attributes of HTML image tag are given below:

1. scr:

It is a necessary attribute that describes the source or path of the image. It instructs the browser where to look for the image on the server.

The location  of  image may be o the same directory or another server.

2. alt:

The alt attribute defines an alternate text for the image, if it can't be displayed. The value of the alt attribute describe the image in words. The alt attribute is considered good for SEO prospective.

3. width:

It is an optional attribute which is used to specify the width to display the image. It is not recommended now. You should apply CSS in place of width attribute.

4. height:

It h3 the height of the image. The HTML height attribute also supports iframe, image and object elements. It is not recommended now. You should apply CSS in place of height attribute.

Use of height and width attribute with img tag:

You have learnt about how to insert an image in your web page now if we want ot give some height and width to display image according to our requirement, then we can set it with height and width attributes of image.

Example:

<img src="animal.jpg" height="180" width="300"alt=">

Output:

Use of alt attribute:

We can use alt attribute with tag. It will display an alternative text in case if image cannot be displayed on browser.

Example:

<img src="animal.jpg" height="180" width="300"alt="animal image">

How to get image form another directory / folder?

To insert an image in your web that image must be present in your same folder where you have put the HTML file. But if in some case image is available in some other directory then you can access the image like this:

<img src="D:\Shahnawaz\Image" height="180" width="300" alt="animal image">

Output:

Use <img> tag as a link:

We can also link an image with other page or we can use an image as a link. To do this put <img> tag inside the <a> tag.

Example:

<a href="https://www.shaahnawaz.com/image"><img src="rabbit" height="100" width="100"></a>

Output:


Saturday, July 24, 2021

HTML Anchor tag: Anchor tag in HTML - HTML Tutorial

HTML Anchor tag:

The HTML anchor tag defines a hyperlink that links one page to another page. It can create hyperlink to other web page as well as files, location, or any URL. The "href" attributer is the most important attribute of the HTML a tag. and which links to destination page or URL

href attribute of HTML anchor tag:

The href attribute is used to define the address of the file to be linked. In other words, it points out the destination page.

The Syntax of anchor tag is given below:

<a href="#">Link Text </a>

Example:

<a href="second.html">Click of Second Page</a>

Output:

target attribute of HTML anchor tag:

If we want to open that link to another page then we can use garget attribute of <a> tag. With the help of this link will be open in next page.

Example:

<!DOCTYPE html>

<html>

<head>

<title> </title>

</head>

<body>

<p> Click on  <a href="https://www. shaahnawaz.com/" target="-blank">this-link</a>to go on home page of Mohammad Shahnawaz.</p>

</body>

</html> 

Output:

Note: 

  1. The target attribute can only use with href attribute in anchor tag.
  2. If we will not use target attribute then link will open in same page.

Friday, July 23, 2021

HTML Phrase tags: Phrase tags in HTML - HTML Tutorial

HTML Phrase tags:

The HTML phrase tags are special purpose tags, which defines the structural meaning of a block of text or semantics of text. Following is the list of phrase tags, some of which we have already discussed in HTML formatting;

  • Abbreviation tag: <abbr>
  • Acronym tag: <acronym> (Not supported in HTML5)
  • Marked tag: <mark>
  • Strang tag: <strong>
  • Emphasized tag <em>
  • Definition tag: <dfn>
  • Quoting tag; <blockquote>
  • Short quote tag: <q>
  • Code tag: <code>
  • Keyboard tag: <kbd>
  • Address tag: <address>

Wednesday, July 21, 2021

HTML Paragraph tag: Paragraph tag in HTML - HTML Tutorial

 
HTML Paragraph tag:

HTML paragraph or HTML p tag is used to define a paragraph in a web page or HTML document. Paragraph s are basically blocks of similar content, images, links, etc grouped together and displayed on a web-page. It  always starts with a new line and browsers automatically add some white spaces before and after each paragraph. It has a starting <p> and ending</p> tag. 

Example: 

<p>This is first paragraph.</p>

<p>This is second paragraph</p>

<p>This is third paragraph</p>

IMPORTANCE OF HTML Paragraph tag:

  • Paragraphs give a structural view to the document making it more readable.
  • Paragraphs can contain related content such as text, images and forms etc.
  • It demarcates a particular block of content from the rst of the content, thus making it easier to comprehend.

PROPERTIES OF HTML Paragraph:

  • The browser add some white spaces before and after each paragraph.
  • Multiple spaces specified by the user, within a paragraph are reduced to single space by the browser.
  • Similarly multiple lines entered within a paragraph are reduced  to a single line. 
  • Browsers separate the paragraphs by a blank line.

SPACE INSIDE HTML Paragraph:

If you put a lot of spaces inside the HTML <p> tag browser removes extra spaces and extra line while displaying the page. The browser counts number of spaces and lines as a single one.

Example:

<p>

I am toing to provide

you a tutorial on HTML and 

hope that it will be very 

beneficial for you.

</p>

<p>

Look I put here a lot of space                 but                          I know browser will ignore it.

</p>

<p>You cannot determine the display of HTML because resized windows may crate different result</p>

Output:

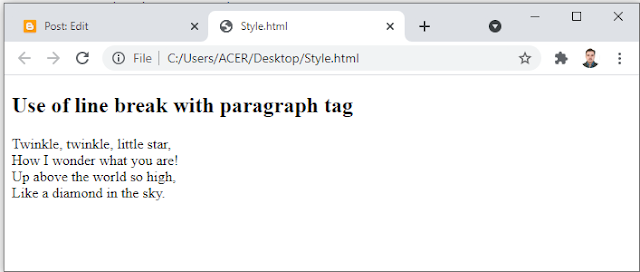
USE OF Line Break or <br> tag:

An HTML <br> tag  is used for line break and it cab be used with paragraph elements. 

Example:

<!DOCTYPE html>

<html>

<head>

</head>

<body>

<h2>use of line break with paragraph tag</h2>

<p>Twinkle, twinkle, little star,<br>

How I wonder what you are!<br>

Up above the world so high,<br>

Like a diamond in the sky.<br>

</p>

</body>

</html>

Output:

USE OF Horizontal Rule or <hr> tag:

An HTML <hr> tag is used to apply a horizontal line between two statements or two paragraphs.  

Example:

<!DOCTYPE html>

<html>

<head>

</head>

<body>

<h2>use of horizontal line with paragraph tag</h2>

<p>An HTML hr tag draw a horizontal line and separate two paragraphs with that line

<hr>it will start a new paragraph.

</p>

</body>

</html>

Output:


Monday, July 19, 2021

HTML Heading: H1 to H6 Tags in HTML - HTML Tutorial

 HTML Heading - H1 to H6 Tags in HTML:

HTML heading is a basic need to make our web page attractive and systematic. In order to achieve this, HTML5 provides six basic headings tags (h1 to h6) that are displayed on the webpage as titles, subtitles or any other relevant details. Let us learn these heading in HTML in details now.

IMPORTANCE OF HTML HEADING:

1. In order to attract and engage the users, it is important to drive their attention to the most important domains of the web page. HTML headings  highlight these important  domains and provide a proper structure to the HTML document.

2. Headings are useful for various such engines, such as Google, to index the layout and content of their web pages.

3. Headings offer an efficient and fast perusal of the web page for the users.

4. HTML headings can be nested with other elements and provide a better structure to the HTL document.

5. The purpose of the overall page can be depicted using these headings.

HTML HEADER TAGS:  

There are six different HTML heading which are defined with the <h1> to <h6>, tags from highest level h1 (main heading) to the least level h6 (least important heading).

h1 is the largest heading tag and h6 is the smallest one. So h1 is used for most important heading and h6 is used for least important.

Headings in HTML helps the search engine to understand and index the structure of web page.

The heading tags can be styled using the style attribute and its properties. By default, the CSS styling used for headings by most of the browsers are:

Saturday, July 17, 2021

HTML Formatting : Text Formatting - HTML Tutorial

HTML Formatting:

HTML Formatting  is a process of formatting text for better look and feel. HTML provides us ability to format text without using CSS. There are many formatting tags in HTML These Tags are used to make text bold, italic and underlined. There are almost 14 options available that how text appears in HTML. 

Formatting tags are divided into two categories:-

  • Physical tag: These tags are used to provide the visual appearance to the text.
  • Logical tag: These tags are used to add some logical or semantic value to the text.

Following is the list of HTML formatting text:

<b> This is a physical tag, which is used to bold the text written between it.

<strong> This is a logical tag, which tells the browser that the text is important.

<i> This is a physical tag which is used to make text italic.

<em> This is a logical tag which is used to display content in italic.

<mark> This tag is used to highlight text.

<u> This tag is used to underline text written between it.

<tt> This tag is used to appear a text in teletype. (Not supported in html 5)

<strike> This tag is used to draw a strikethrough on a section of text. (Not supported in html 5)

<sup> It displays the content slightly below the normal line.

<sub> It display the content slightly below the normal line.

<del> This tag is used to display the deleted content.

<ins> This tag displays the content which is added.

<big> This tag is used to increase the font size by one conventional unit.

<small> Tis tag is used to decrease the font size by one unit from base font size.

1. BOLD TEXT: 

HTML <b> and <strong>formatting elements

The HTML <b> element is a physical tag which display text in bold font, without any logical importance. If you write anything within <b>....</b> element is shown in bold letters.

Example:

<p> <b> Write your first paragraph in bold text.</b> </p> 

Output:


 The HTML <strong> tag is a logical tag which displays the content  in bold font and informs the browser about its logical importance. If you write anything between <strong>.........</strong> is shown important text.

Example:

<p> <strong>This is an important content</strong> and this is normal content</p>

Output:


 Example:

<!DOCTYPE html>

<html>

<head>

<title>Formatting elements</title>

</head>

<body>

<h1>Explanation of formatting element</h1>

<p><strong>This is an important content</strong>, and this is normal content</p>

</body>

</html>

Output:

2. ITALIC TEXT:

HTML <i>and <em> formatting elements

The HTML <i> element is physical element which display the enclosed content in italic font without any added importance. If you write anything within <i>.....</i> element is shown in italic letters.

Example:

<p><i> Write your first paragraph in italic text.</i></p>

Output:

The HTML <em> tag is a logical element which will display the enclosed content in italic font, with added semantics importance.

Example:

<p><em> This is an important content</em> which displayed in italic font.</p>

Output:

Example:

<!DOCTYPE html>

<html>

<head>

<title>Formatting elements</title>

</head>

<body>

<h1>Explanation of italic formatting element</h1>

<p><em>This is an important content</em>,which displayed in italic font.</p>

</body>

</html>

3. HTML MARK FORMATTING:

If you want to mark or highlight a text you should write the content within <mark>......</mark>.

Example:

<h2> I want to put a<mark>Mark</mark>on your face</h2> 

Output:


4. UNDERLINE TEXT:

If you write anything within  <u>.......</u> element is shown in underlined text. 

Example:

<p> <u> Write your first paragraph in underlined text.</u> </p>

Output: 

5. STRIKE TEXT:

Anything written within <strike>-------------------</strike> element is displayed with strike through. It is a thin line  which cross the statement.

Example:

<p> <strike>Write your first paragraph with strikethrough</strike> </p>

Output:

6. MONOSPACED FONT:

If you want that each letter has the same width then you should write the content within <tt> -----</tt> element.

We know that most of the fonts are known  as  variable -width fonts because different letters have different width. (example 'w' is wider than 'i' ), Monospaced font provides similar space among every letter.

Example:

<p> Hello<tt> Write your first paragraph in monospaced font.</tt> <p>

Output:

7. SUPERSCRIPT TEXT:

If you put the content within <sup>-------------</sup> element is shown in superscript, means it is displayed half a character's height above the other characters..

Example:

<p> Hello<sup> Write your first paragraph in superscript. </sup> </p>

Output:

8. SUBSCRIPT TEXT:

If you put the content within  <sub>--------<sub> element is shown in subscript means it is displayed half a character's height below the other characters.

Example:

<p> Hello<sub>Write your first paragraph in subscript.</sub> </p>

Output:

9. DELETED TEXT:

Anything that puts within  <del>---------------</del> is displayed as deleted text. 

Example:

<p> Hello<del>Delete your first paragraph. </del> </p>

Output:

10. INSERTED TEXT:

Anything that puts within <ins>---------</ins> is displayed  as inserted text.

Example:

<p> <del>Delete your first paragraph.</del> <ins>Write another paragraph</ins> </p>

Output:

11. LARGER TEXT:

If you want to put your font size larger than the rest of the text then put the content within  <big>----</big> It increase one font size larger than the previous one.

Example:

<p>Hello> <big>Write the paragraph in larger font.</big></p>

Output:

12. SMALLER TEXT:

If you want to put your font size smaller than the rest of the text then put the content within  <small>---</small> tag. It reduces one font size than the previous one.

Example:

<p>Hello<small>Write the paragraph in smaller font.</small> </p>

Output: